Equipment Needed
Music player, Music, Control Cones, Safety Rules Poster, Stretching Station Cards, PowerPoint: Dynamic Body Shapes – Lesson 12, Hoops, Bean Bags, Body Part cards, Body Shape Cards, Butterfly/Caterpillar and Cocoon cards, six sided dice/12 sided dice, Slide Whistle, Chimes.
Content Standard Benchmarks or Common Core Standards
Learning Goals, Objectives, Expected Outcomes
Psychomotor
- Physically make the shapes; Narrow, Wide and Round with their body and body parts.
- Actively participates in the lesson activities and exercises.
- Gain strength and flexibility through movement and stretching exercises.
Cognitive
- Verbally describe qualities of the three shapes; Narrow, Wide and Round.
Affective
- Move and work safely among other children.
- have fun!
|
Part 1
Warm-up/Review
10 – 15 Minutes |
5 Noses
(To the children:)
“Today you are going to play a game that is called 5 Noses! Wouldn’t that be funny if you had five noses! Well, that’s not really what happens in this game.
First, I’m going call out a body part, let’s try foot.
(roll the dice) Look at that, the dice landed with the number 3 on top. The dice tells you how many bean bags to touch. That means, when I say go again, you will travel to a 3 different bean bags, and touch your FOOT on each of the three bean bags. Freeze with your foot on the 3rd bean bag. Then I’ll know you are finished. Ready? Go.
(You may want to choose one child to demonstrate before you have everyone try the first time.)
Teaching Tips:
You can practice with one, until everyone does it correctly; continue to choose different body parts to touch to the bean bag. You can use a child as an example by asking the child to show the class how they traveled to the bean bag, touched it with their foot and then found an own space. Let them actually get up and show everyone.
(To the children:)
“Count out loud as you touch each bean bag.”
“Ok, now instead of me picking the body part, I’m going to ask one of you to call a body part.”
Continue to let the children take turns calling the body parts out.
Stomach, Back, Hip, Shin, Seat, Knee, Foot, Shoulder, Elbow, Hand, Head (Show the children how to do this before letting them do it. Keep both hands and feet on the ground around the bean bag as you touch your head to it.)
After a few times, let different children take turns rolling the dice.
Put the dice away and let the children choose the number and body part. Choose one child to pick a body part and a second child can choose the number. Continue doing this until each child has had a chance to choose either the number or the body part. |
Assessment Strategies:
- As your children are moving watch to see that they are;
- Using the correct body parts when they touch the bean bag.
- Traveling safely
- Moving to open spaces & Traveling away from other children.
- Touching/Counting the correct number of bean bags.
Differentiation Strategies:
Easier: Focus is mainly on Body Part Identification. Verbally reward the children that safely touch the correct body parts on the bean bag. Specific verbal, in the moment rewards are most effective. Safety is still the most important piece of this lesson.
Challenge: Find different ways to travel to each bean bag; change directions, levels, body shape, etc.
Put tape on the dice so that you can roll higher numbers. For example: six sided dice with the numbers 5, 6, 7, 8, 9 and 10 taped, one on each side, to practice counting to higher numbers.
Use two dice and ask the children to add the two together to discover how many bean bags to touch. |
Part 2
New skill or concept
10 Minutes |
Show the children; A dried piece of spaghetti, a round ball and a Picture of a butterfly wide open! If Possible have a real piece of spaghetti, a real ball and a picture of the butterfly you will use later in the lesson.
(To the children:)
“What do you think these three things are for? Hmm, a Very NARROW piece of spaghetti, a ROUND circular ball and a WIDE stretched open Butterfly? Well you are going to make the same shapes with your body!” These are three shapes we can make with our body, NARROW, WIDE, and ROUND.
Show the children the pictures of the shapes as you ask them to create the shape.
Narrow
Look at how long and narrow the spaghetti is! When I say go, Find a new mat and make your body into a very narrow shape. Stretch your body so you are as Narrow as possible.
- Make a different kind of Narrow shape with your body. You can look at the pictures, or at your friends for some ideas.
- Change your level and create a Narrow shape.
- “Remember that your arms and legs can help create the narrow shape. Keep them close to your body as you make your narrow shape.”
Wide
“The opposite of Narrow is Wide. If keeping your arms and legs close to your body creates a Narrow shape, How do you want to position them to create a wide shape? That’s right, they will have to be away from your body.
- Find a new own space and create a wide shape.
- Change your level and create a new wide shape
- Use the level you haven’t tried yet and create a wide shape.
Round
“Go to a new own space and show me a shape that is round like a ball, or an orange! Curl your spine to create a round shape. You can curl forward or backwards to make your round shape.”
- Stand on your two feet and curl to make a round shape on your two feet.
- Take your weight on your seat and curl to make a round shape.
- Take your weight on your hip and curl to make a round shape.
- Travel to another own space and create another round shape.
|
   |
Part 3
Practice
10-15minutes |
Guided Stretch and Curl
To the children:
- “Stay in your own space and begin stretching your arms and legs out to make a wide shape with your body.
- Slowly curl your arms and legs in to make a round shape.
- Stretch out long in a low level to make a Narrow shape.
- Curl up into a round shape with your weight on your side surface.
- Stretch out to make Narrow shape on your front surface.
- Curl up to make a round shape on a different body surface.
- Each time you curl, change the body surface or body part you are balancing on.
- Each time you stretch, change your level.
Creative Stretch & Curl
(To the children:)
- “Listen to this! (play the slide whistle) When you hear the sound go up like this (play the slide with the note getting higher) begin Stretching your body into a narrow or wide shape. See if you can stretch your body up slow and smooth while the slide is playing and be finished stretching when the slide stops. This time, curl up make a small round shape and when you hear the slide whistle get lower!” Do this a couple times, challenge the children to make different shapes each time. Encourage them to alternate between wide and narrow each time they stretch out.
- “Now we’re going to put it all together. When you hear the whistle get higher, you will stretch out. When it gets lower, you will curl up. Stay on your mat and see if you can keep curling and stretching with the slide whistle sound.”
- Keep playing the slide whistle as the children stretch and curl on their mat. Encourage them to make a different shape each time they stretch and curl. The children can curl or stretch different body parts first; even finish curling on different body surfaces.
|
Begin part three with the guided stretch and curl. Continue if you have time to do the creative stretch and curl with the children.
Let the children change mats every minute or so.
The final activity “Butterfly Dance” should be done during the second lesson for the week. |
Part 4
Stretching & closure
Taking it Home
5 Minutes |
Do not skip the stretching.
“Find an own space and sit down”
Teaching Tips:
Stretching is slow and controlled. There is no bouncing in stretching. Hold the pose so that you feel slight tension but not pain. Hold each pose for 30 seconds.
Ball Pose – Back Stretch
 Take your weight on your seat/bottom and hold your knees in to your chest and stomach. Let your body be round like a ball! Hold this for 10 seconds. Keep your ball shape and slowly rock onto your back, and then up onto your seat again. You can continue to transfer your weight as you slowly rock back and forth, from your back to your seat, keeping your ball shape. Take your weight on your seat/bottom and hold your knees in to your chest and stomach. Let your body be round like a ball! Hold this for 10 seconds. Keep your ball shape and slowly rock onto your back, and then up onto your seat again. You can continue to transfer your weight as you slowly rock back and forth, from your back to your seat, keeping your ball shape.
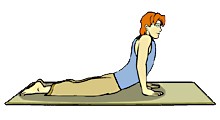
Cobra Stretch – Stomach
Cat Stretch – Back
  
Review [2-5 Minutes]
Teaching Tips:
Meet the class meet in your common meeting place to close. This defines the beginning and end of the lesson. This is a cognitive review, make sure the children use words to describe the answers and not only their body!
While you are discussing the points regarding body shapes, hold the cue cards up for the visual learners to see.
- What are the three body shapes you worked with today? (Wide, Narrow, Round)
- Turn to you a person next to you and talk with them about the different ways your butterfly traveled inside the boundaries.
|
|

