
Week 9 Body Surfaces and Shapes PowerPoint
GRADE |
TOPIC |
UNIT |
Pre-K |
Body Surfaces and Shapes |
Gymnastics |
Equipment Needed
Content Standard Benchmarks or Common Core StandardsLearning Goals, Objectives, Expected OutcomesPsychomotor
Cognitive
Affective
|
||
ACTIVITY |
PROCEDURE AND TRANSITIONS WITH MODIFICATIONS AND OR ACCOMMODATIONS |
SETUP DESCRIPTION OR DIAGRAM |
Entrance Routine |
If Possible have the spots spread out inside room space. If not, ask the students to get a spot and a card from a hoop and put them in own spaces as they come into the gym or class space. | |
Part 1Warm-up/Review |
Safety – Review Safety
Today you are going to play Color Hunt! Under your spots are cards that have different colors on them. Choose one student to try for the example: Billy, look at the color UNDER your spot. Once you see the color, put your spot back over it and stand on your spot to show me you are ready. Ok, what color did you have, Billy? Green! Do you see a green spot inside our boundaries? Billy, travel to the green spot and look under the new spot! What color is under there? Blue! Now what do you think you have to do? That’s right, go to a blue spot and look underneath! Now you all get to try. When the music starts you are going to look at the color UNDER your spot. Once you see the color, travel to the new spot and look under to find out the next color to travel to. Keep going until I say stop! Start the music! (make sure they all look and leave the card under the spot) |
As the children are playing you can assess their ability to identify color and to verbalize the color name. |
Transition |
When I say go, get a mat from the side that matches the spot you are on now. Put the mat on top of your spot. | |
Part 2New skill or concept |
Body Surfaces
“Look at the picture of this boy, This is the front of his body. It is called the Front Surface. “ Review the body parts that are on the front surface. Have everyone say the name and put their hands on the different parts as you say them. Make it fun, not too long! “Stay on your mat and make a shape on your front surface.“ “What is another shape you can make on your front surface?” “Travel to a new mat and make a shape on your front surface.” Continue to do this at least 3 times. Follow the same routine for the back surface and then the Side surface. |
|
Transition |
Continue using the same set up. | |
Part 3Practice |
Ok! You have got it the idea so let’s play a game.
Listen and watch to see which body surface to make a shape on. I have a picture of children making shapes on all the different body surfaces. When the slide changes you will see a new surface to make a shape on. When the new slide comes up, you will travel to a new mat and make a shape on that new mat! Remember, Each time I say go; look at the new slide to see which body surface to make a shape on and then you find a new mat to make the shape on. Each time you put a new slide up, say go. The children will move from mat to mat, making different shapes on the different body surfaces. Allow the children some time to recognize the surface before you tell them what it is. You can flip back and forth between the different body surfaces. Play the game for at least 5 minutes. Give the children at least 20 seconds to hold the shape before moving to the next slide. |
|
Transition |
Stay on the mat you finished the last shape on. | |
Part 4Stretching & closure Taking it Home |
Stay at your mat, let’s stretch.
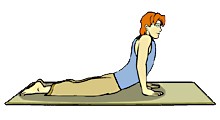
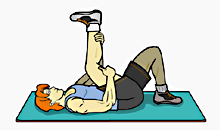
Choose 3 stretches to do with the class. Cobra (front surface), Lying Hamstrings Stretch (Back surface), Lying Quad Stretch (side surface)
Cobra Stretch
Lying Hamstrings Stretch
Lying Quadriceps Stretch Review Pair share: turn and face a person next to you and tell them one body surface you made a shape on. As a class have the students share about their shapes. Closure |
|

Additional Part 3 Activities
Guided Stretch and Curl
(To the children:)
- “Stay in your own space and begin stretching your arms and legs out to make a wide shape with your body.
- Slowly curl your arms and legs in to make a round shape.
- Stretch out long in a low level to make a Narrow shape.
- Curl up into a round shape with your weight on your side surface.
- Stretch out to make Narrow shape on your front surface.
- Curl up to make a round shape on a different body surface.
- Each time you curl, change the body surface or body part you are balancing on.
- Each time you stretch, change your level.
Creative Stretch & Curl
(To the children:)
“Listen to this! (play the slide whistle) When you hear the sound go up like this (play the slide with the note getting higher) When I play this sound, begin Stretching your body into a narrow or wide shape. See if you can stretch your body up slow and smooth while the slide is playing and be finished stretching when the slide stops. Let’s try that again, make a small shape and when you hear the slide whistle, stretch out!” (do this a couple times, challenge the children to make different shapes each time.) “This time, I’m going to play the slide so that the notes get lower. (play the slide whistle with the notes going lower.) When I play the whistle like this you will curl your body. Smoothly curling in your body parts until the whistle stops. Let’s try that a couple times.”
“Now we’re going to put it all together. When you hear the whistle get higher, you will stretch out. When it gets lower, you will curl up. Stay on your mat and see if you can keep curling and stretching with the slide whistle sound.”
Keep playing the slide whistle as the children stretch and curl on their mat. Encourage them to make a different shape each time they stretch and curl. The children can curl or stretch different body parts first; even finish curling on different body surfaces.
